
Motorcycles are relatively simple machines, even modern ones like my 2013 Triumph Bonneville. Yet it’s interesting how one seemingly straightforward decision can create a ripple effect that ends up touching every aspect of a project. That’s what happened to the #SalzmotoBonny project once I’d chosen the Arrow Scrambler Performance Exhaust as my new output system. I knew there would be challenges along the way making that system work on a bike it wasn’t quite designed for, but even in planning, I’d underestimated the hassle. No sooner did I start the engine, however, did all that hassle become entirely worthwhile.
Since sharing the bike online, it’s popped up here and there on various forums and sites, and often people have questions about the side pipe conversion process. So I’m going to attempt to summarize it here, not as a strict how-to, but perhaps more as a guidepost for what you’re in for should you decide you want this sweet piece of fire trumpet hanging off the side of your Bonneville.
As I mentioned in Wrangling an Inappropriate Exhaust, installing the Arrow side pipe on a standard Bonneville (or T100 or Thruxton) involves a handful of Scrambler-specific parts in order to work. Thing is, I’d only really accounted for the side cover in estimating what I’d need to do this conversion. The rear brake master cylinder turned out to be the wildcard. Needing to relocate that meant a domino effect of extra Scrambler parts. Expensive parts, no less:
- The right side cover
- The bracket that goes under the right cover (this also becomes a new mount point for the fusebox)
- The right foot peg mounting brackets. NOTE: The bracket for the Scrambler is a two-piece, and both halves must be ordered. The bracket that comes off the Bonneville is a single unit.
- The rear brake pedal, pivot bolt, etc. These are all separate parts. Make sure you order everything as nothing is reusable between the models.
- Rear brake master cylinder assembly. This mounts to the foot peg bracket. You’re also going to need a new, longer rear brake line.
All in, it was nearly a grand worth of extra parts on top of an already expensive exhaust system. So for those of you who aspire to do the same, I definitely think it’s worth it, but go into it knowing you’re in for some expense.
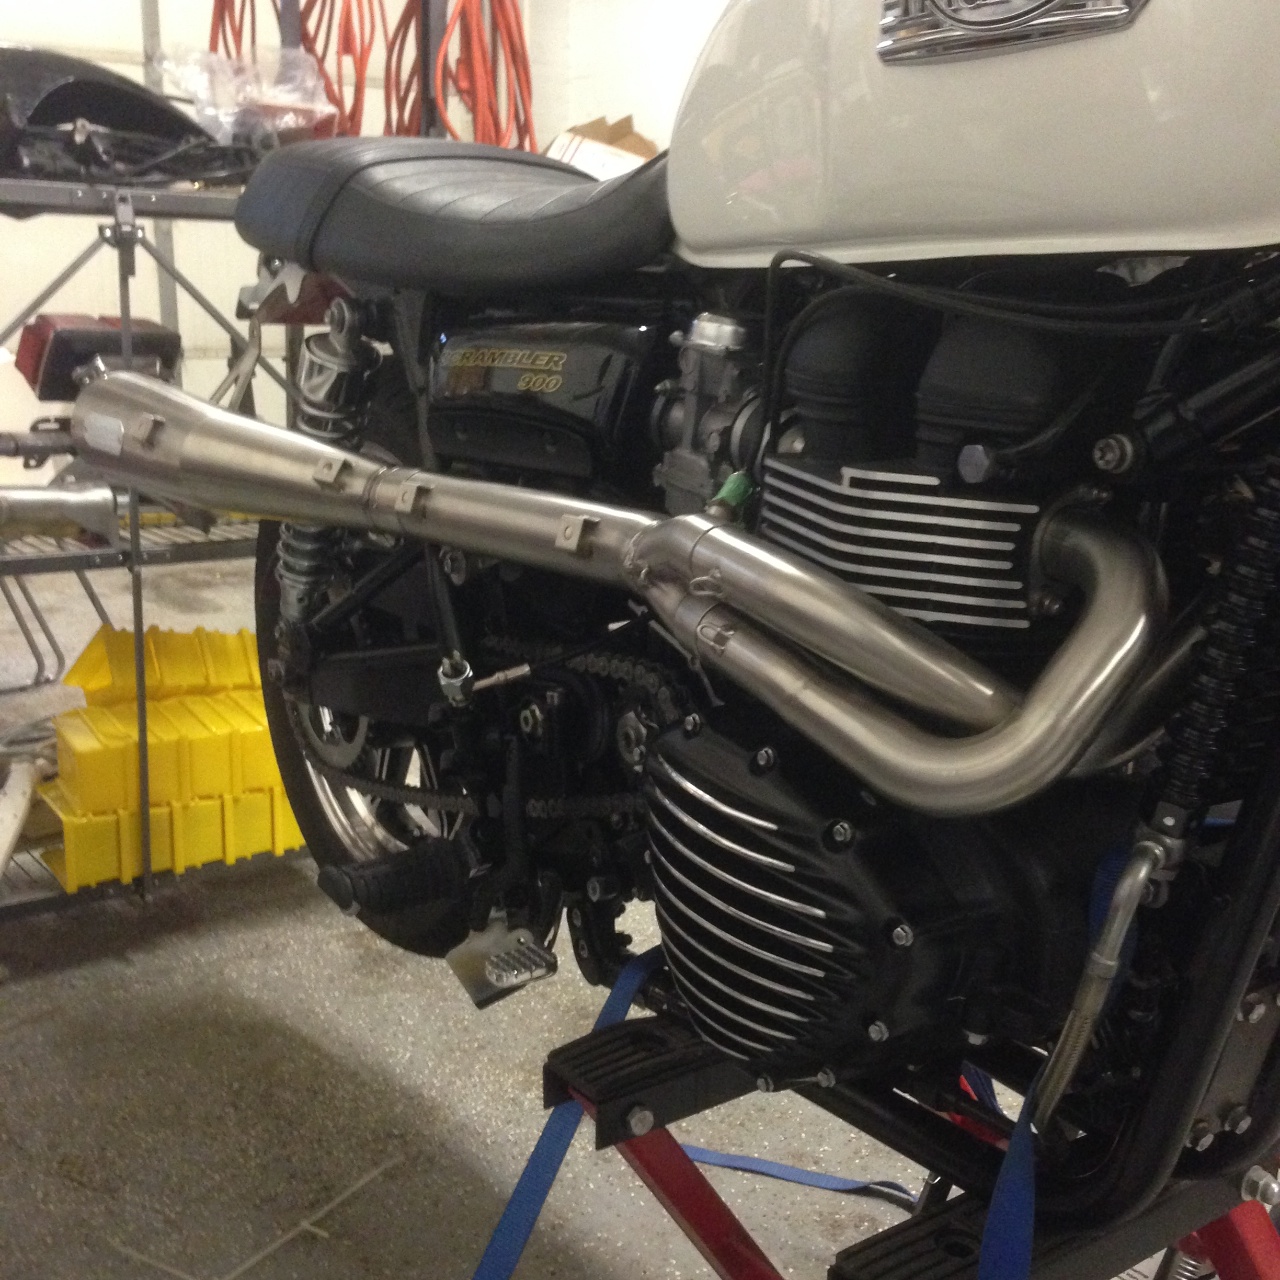
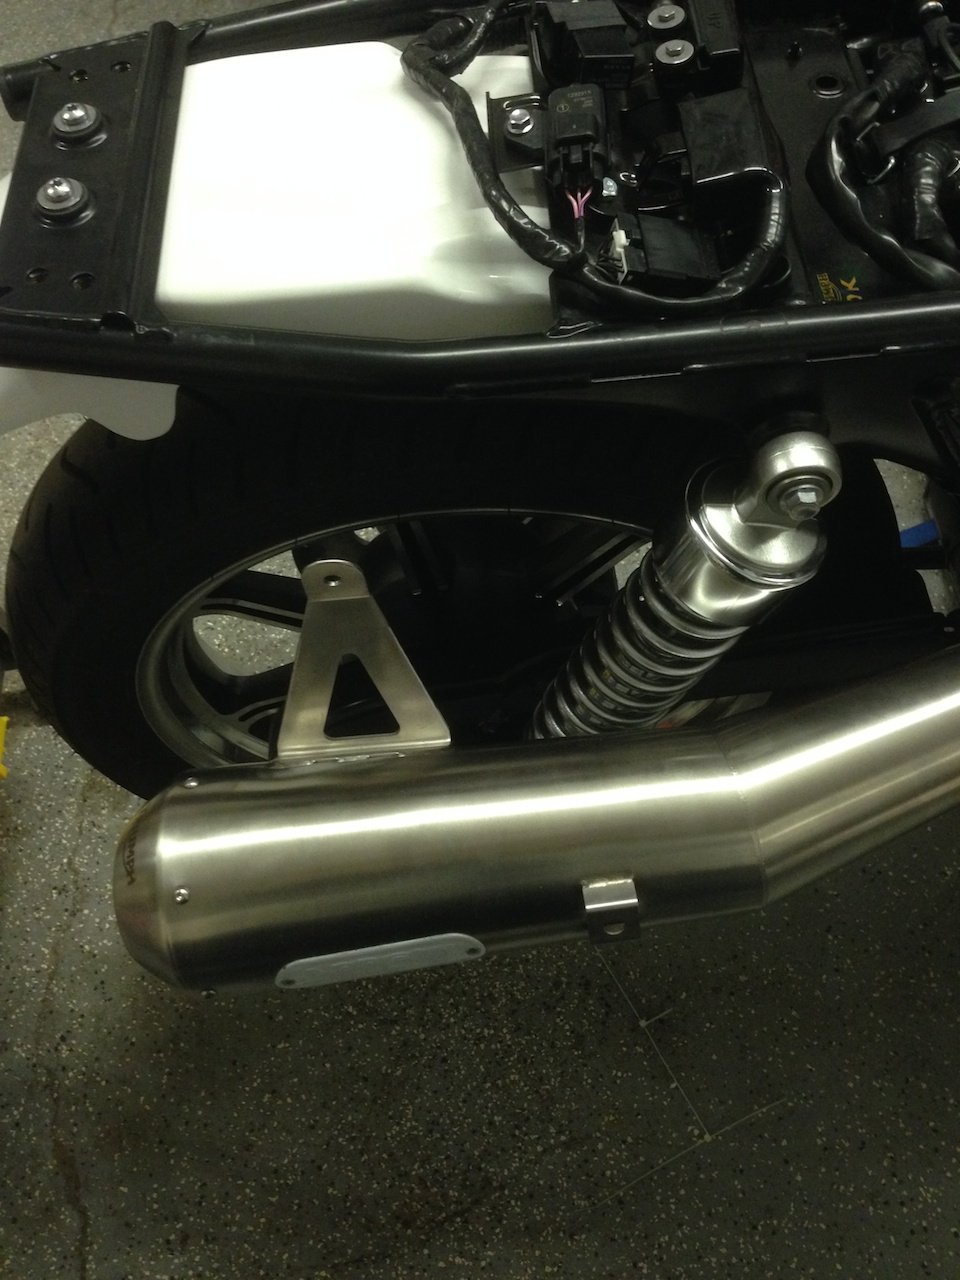
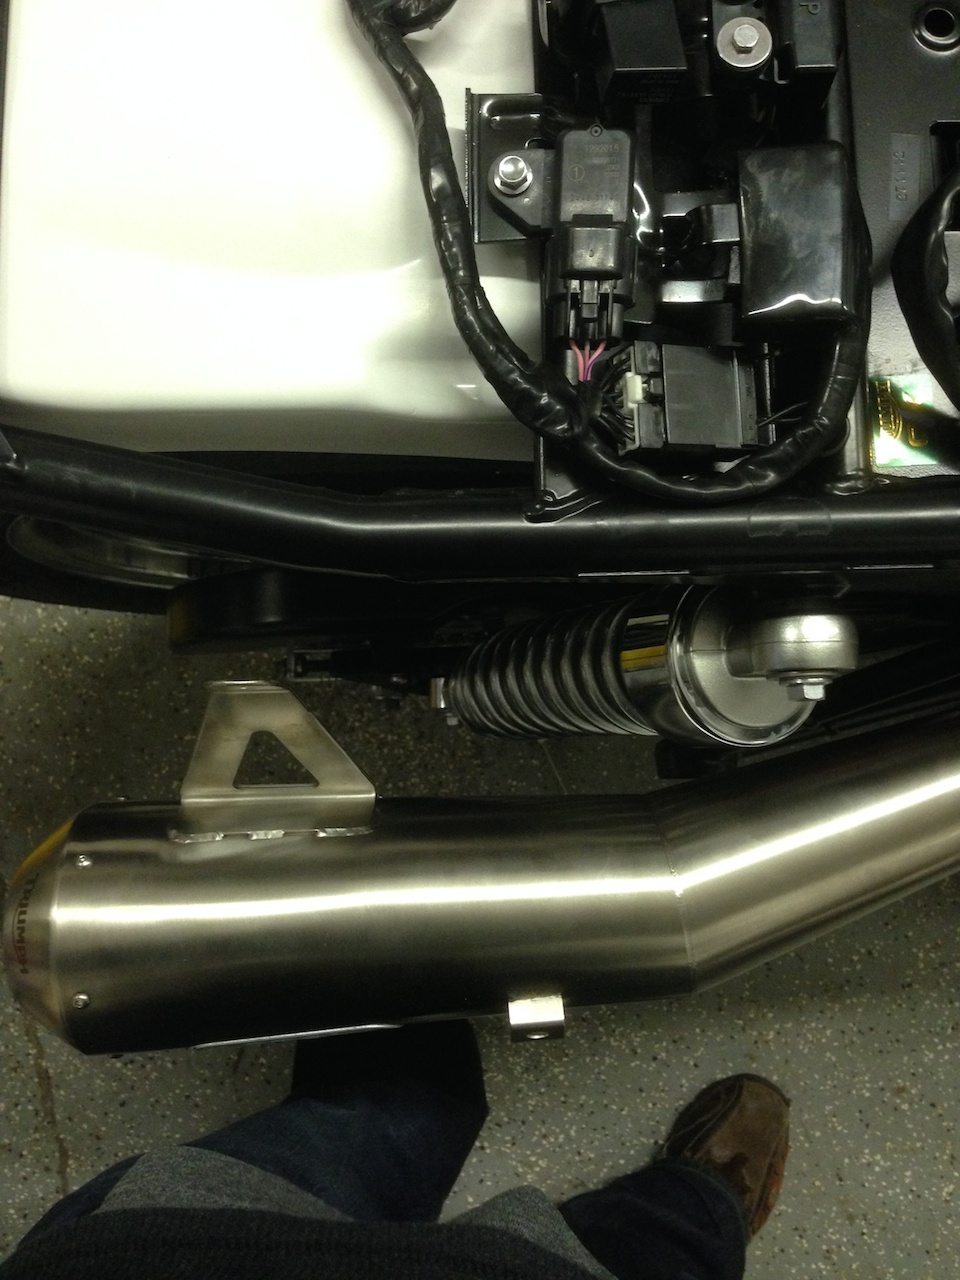
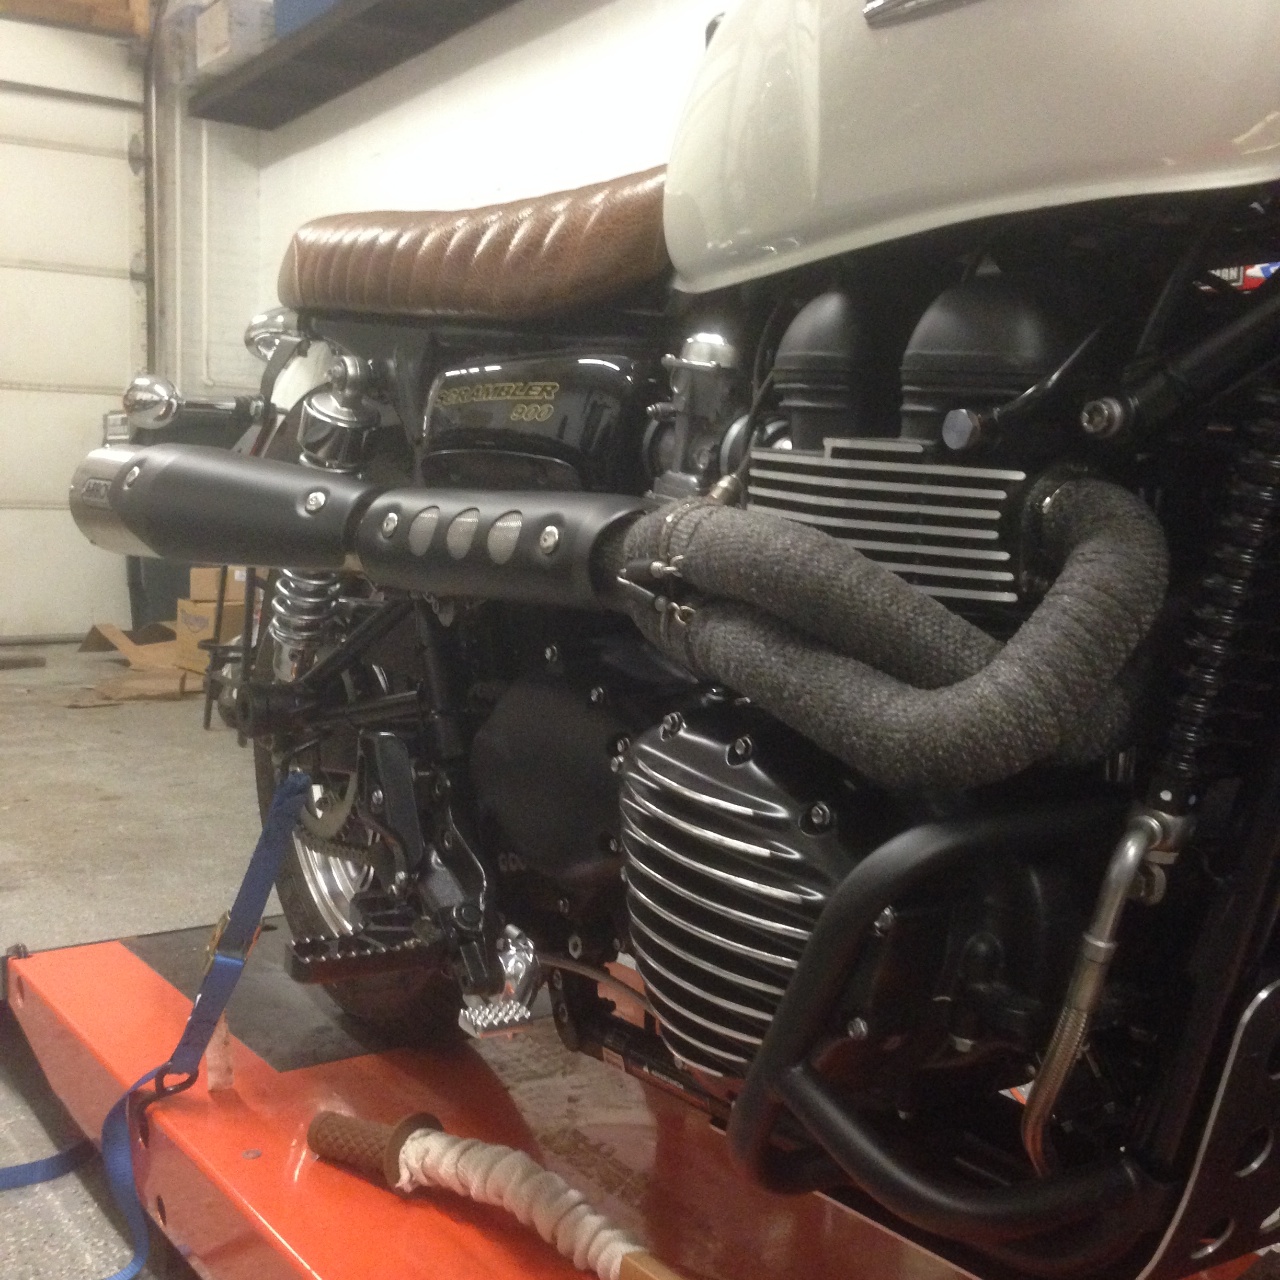
So while these extra Scrambler parts were expensive, these components would actually be the easiest part of installing the exhaust. After all, they’d all just bolt up once I had them in hand. The tricky bit about installing this exhaust was the lack of a rear exhaust hanger. On the Scrambler, there’s a hanger bracket welded onto the rear subframe at the factory. I had no such hanger, and it’s not a spare part you can just order from Triumph. So the exhaust hanger on my Bonneville would be one of the only two pieces of custom fabrication on the whole bike.
My hanger design had two key considerations. It needed to be simple to make and it needed to be removable. I wanted the ability to go back to stock if need be, so welding something onto the frame wasn’t in the cards. Not having to refinish the frame would also be easier.
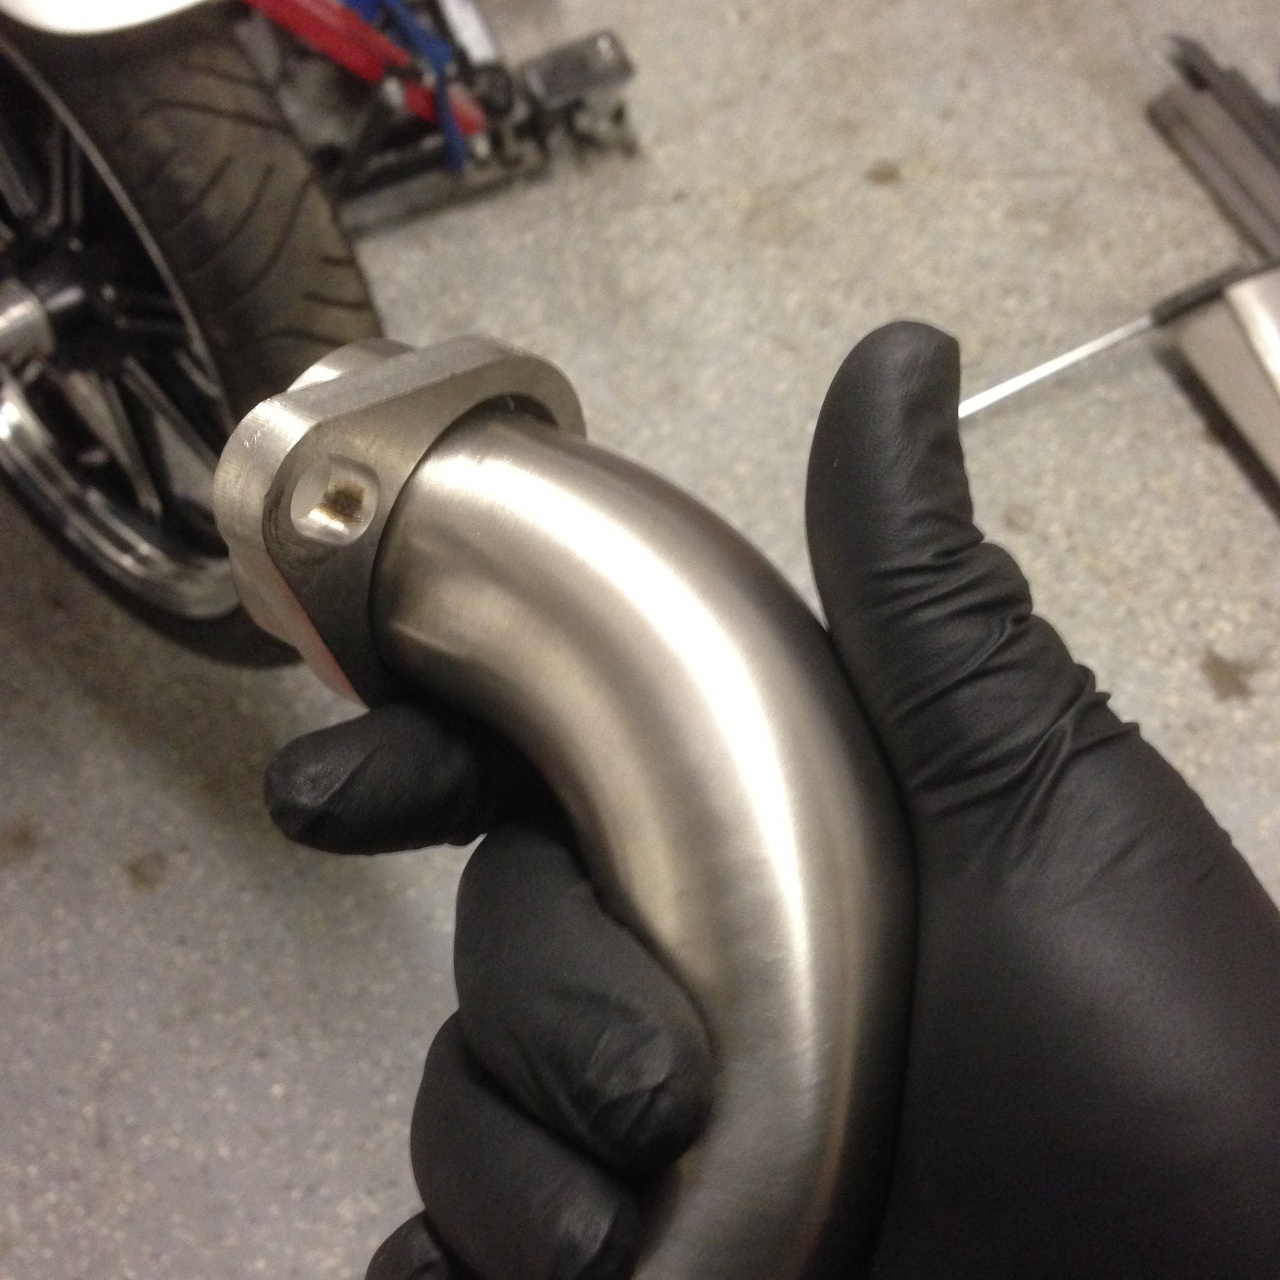
With the exhaust otherwise mounted and its nuts/bolts snugged down in the center section as well as at the engine, I was able to friction fit the last section of the pipe and get a sense for its final location and orientation. With just a touch of play in the joint, I had 1/8″ or so I could exploit as a margin of error. That’s not a lot, but when working in steel, that kind of precision is actually pretty easy to hit.
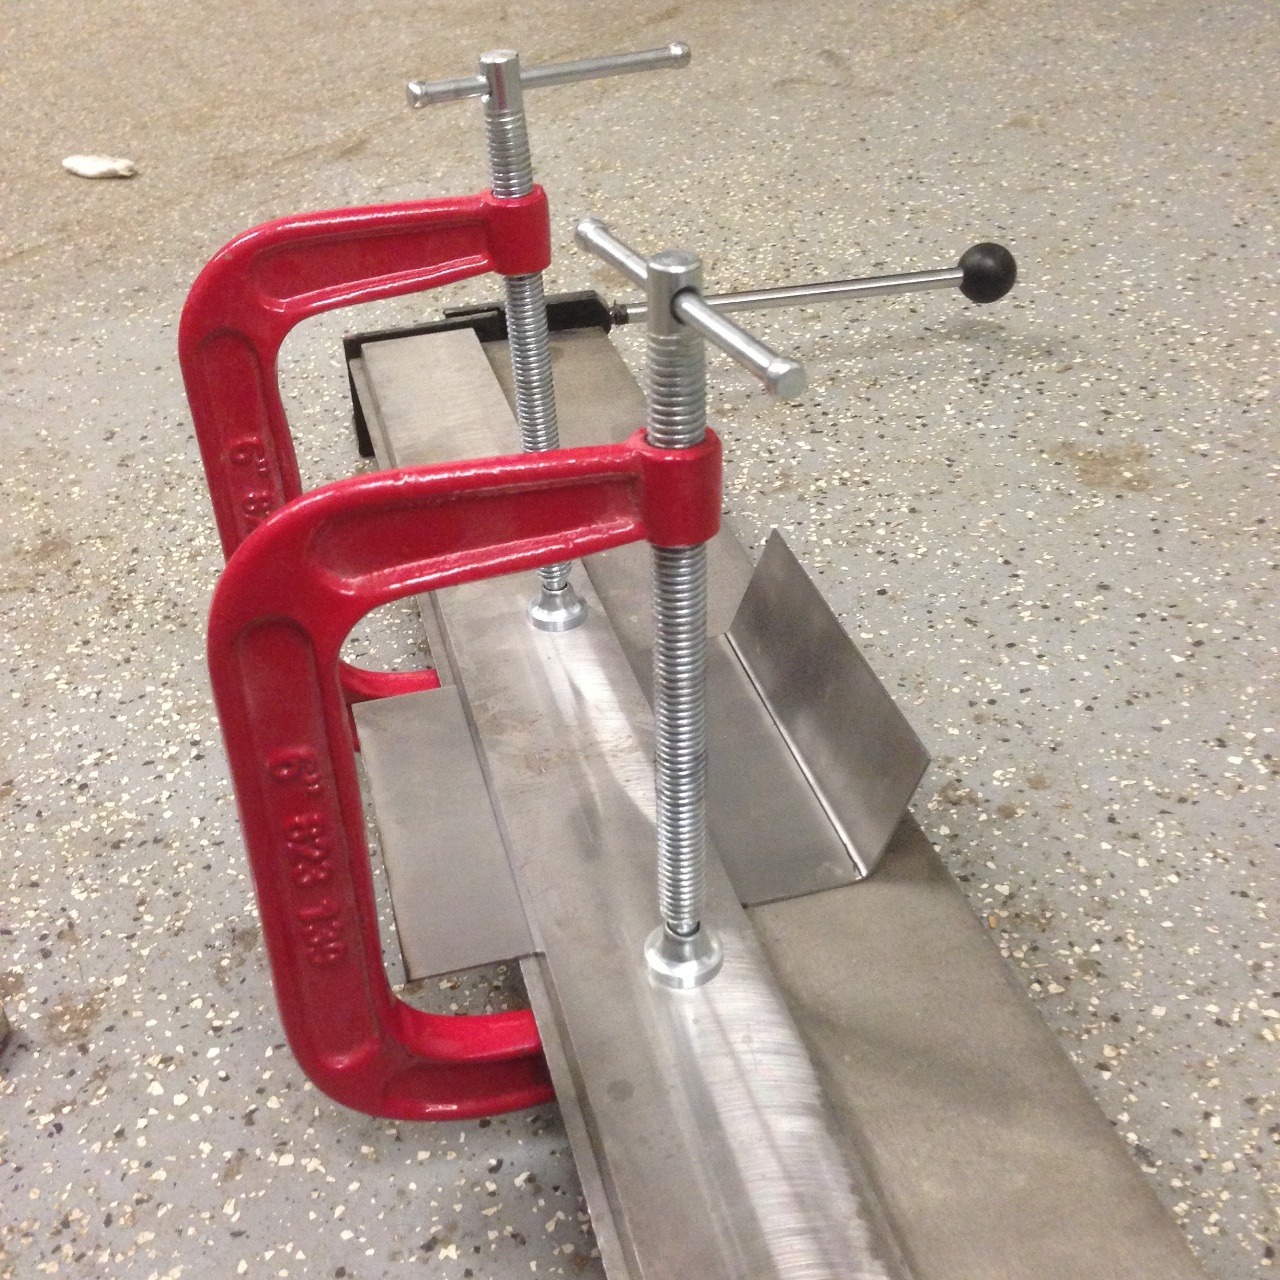
With the pipe dry-fitted, I took a look at the profile of the rear subframe. Between the frame and the mounting ear on the pipe, I needed to basically intersect three planes: the horizontal angle of the frame, the linear angle of the frame back to front, and the vertical plane of the mounting ear. The easiest course of action seemed to be to work from the plane of the mounting ear and intersect the frame from there. That approach saved me a ton of work. With just two bends in my little bench-top brake I could create a bracket in the raw that would intersect everything I needed it to. In fact, I could have done it with a single bend, but that would have been much less attractive. I could have also done it on my bench vice in a pinch. By giving the bracket a bit of an elbow, I was actually able to echo the angle and profile of the pipe’s mounting ear.
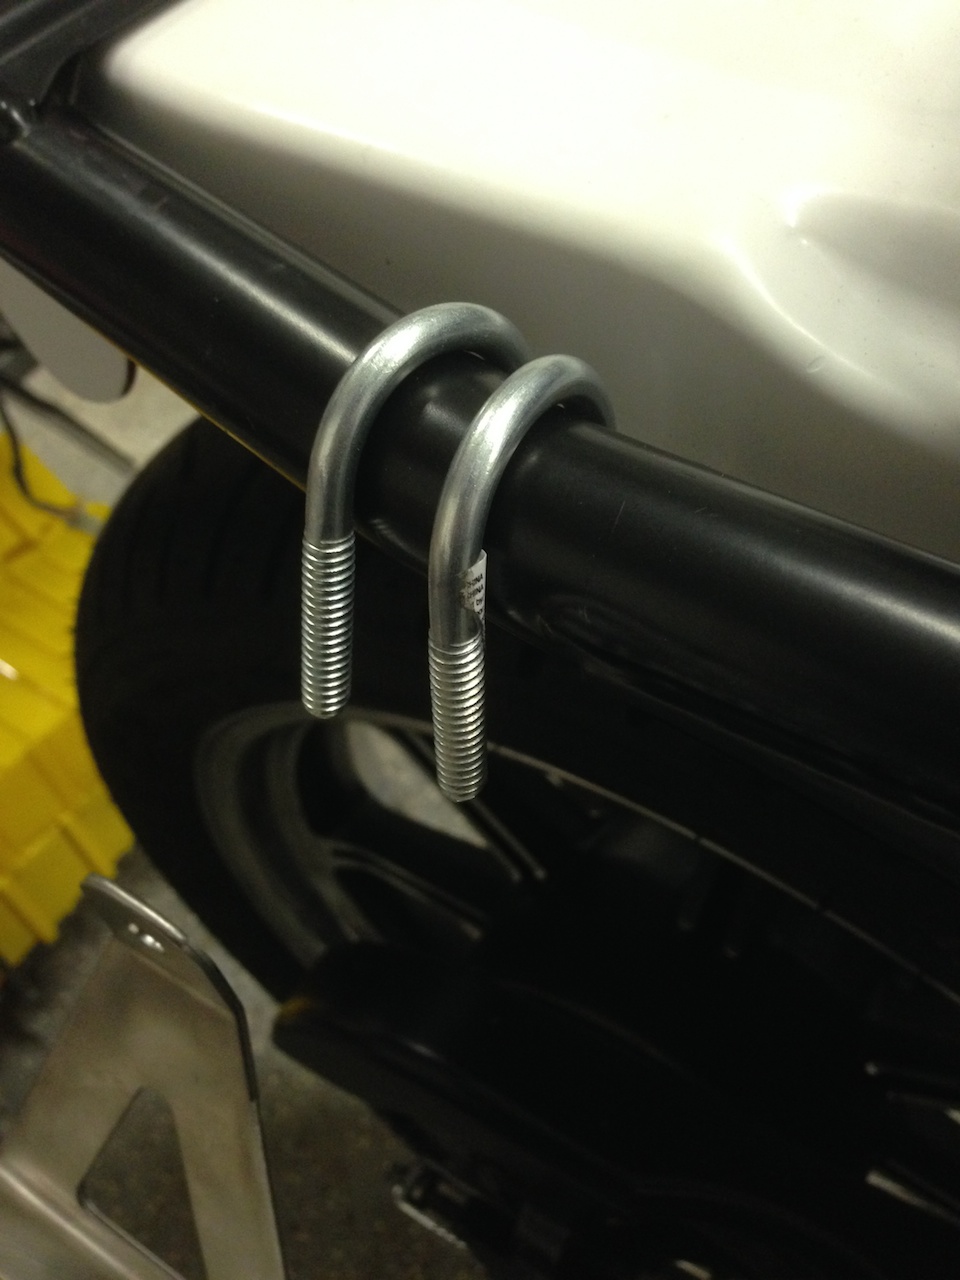
With two of the three plains set, the third was taken care of by simple virtue of how I was mounting the hanger. I used a pair of 1/4″ diameter u-bolts I picked up at Home Depot. I’d left myself enough of a flat surface under the frame that I could drill the mounting holes in the hanger bracket on an angle to match the sweep of the frame. The hanger would sit below the frame, and the u-bolts would hold it tight against the frame with more than enough force to keep it in place. The primary load on the hanger would be down, rather than in any particular direction, so this four-point attachment would be more than enough.
By mocking up the bracket in planes first, I could then shape the bracket based on where it had organically ended up, rather than trying to make a particular shape work in that space. I chose to match the angle of the pipe mounting ear on one side, and then just follow vertical on the other. The result was a very pleasing shape that once mounted up, looked like a piece of factory hardware. For this particular build, that was exactly what I wanted. This bracket had a job to do, and being flashy was not part of that job.
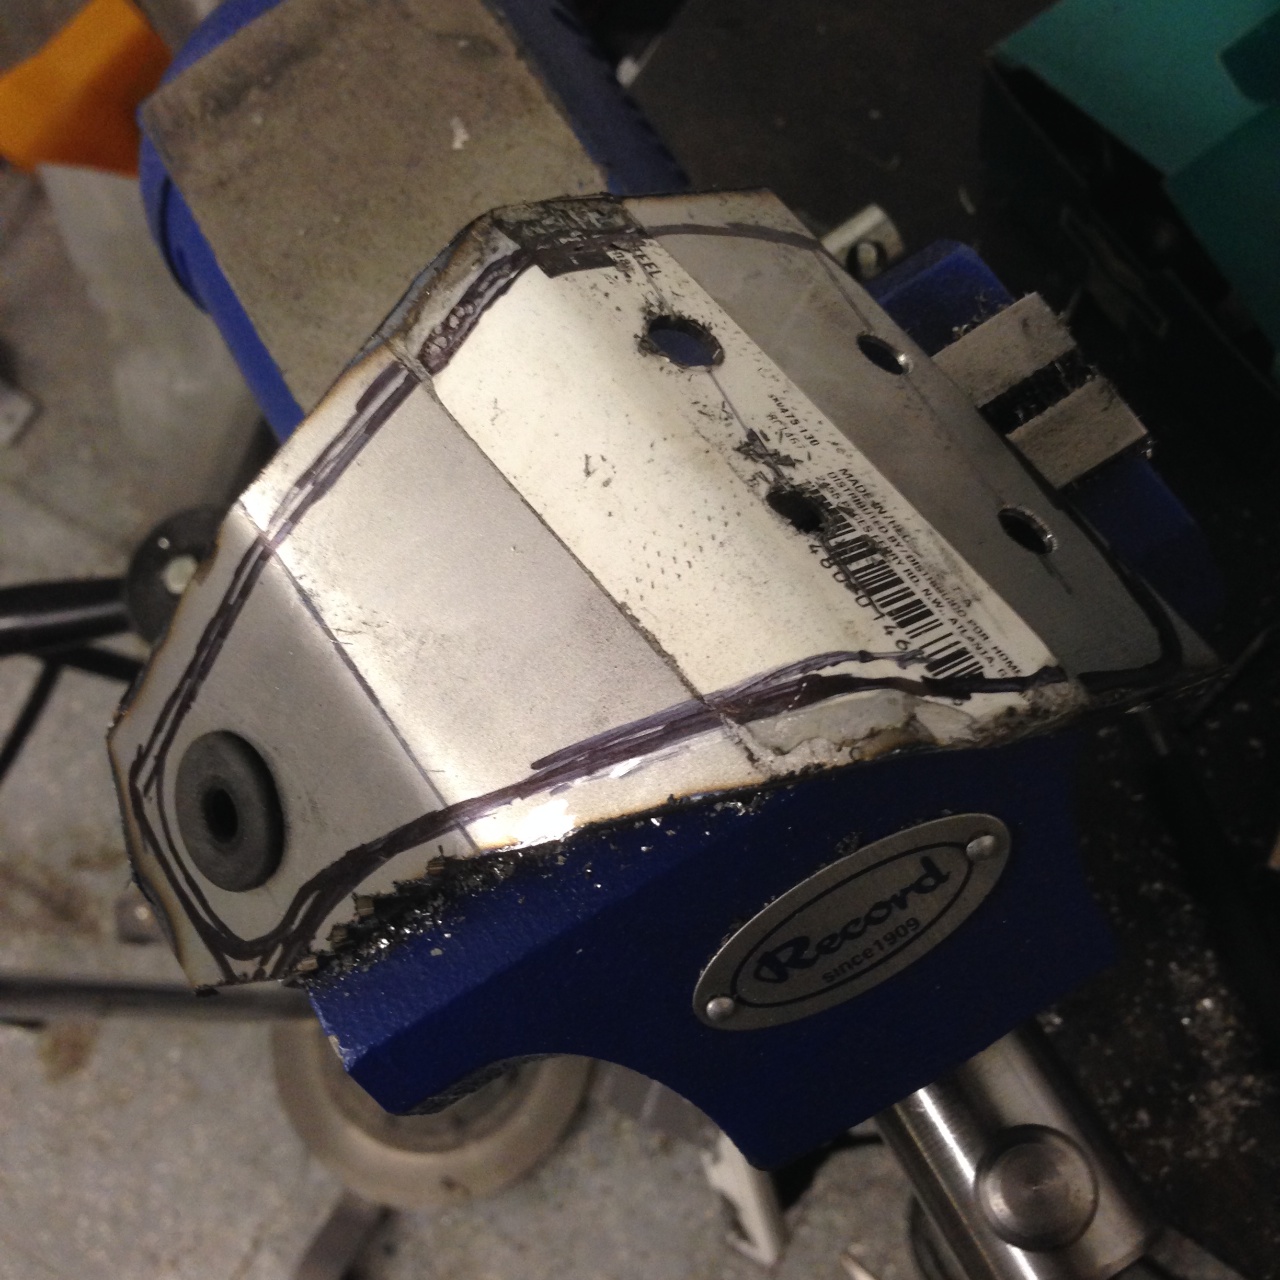
With my final shape sketched out in sharpie on my raw bracket, the job of refining that shape started in earnest. I began on my 12″ bench-top disk sander, but the small piece was a bit unwieldy on such a big, unforgiving tool. I needed something that would efficiently chew through the steel, but that I could handle with precision. I took some big bites with my Dremel and a cut-off disk, but even that was too course. What I finally ended up doing was reversing my thinking. Instead of bringing the tool to the work, I brought the work to the tool.
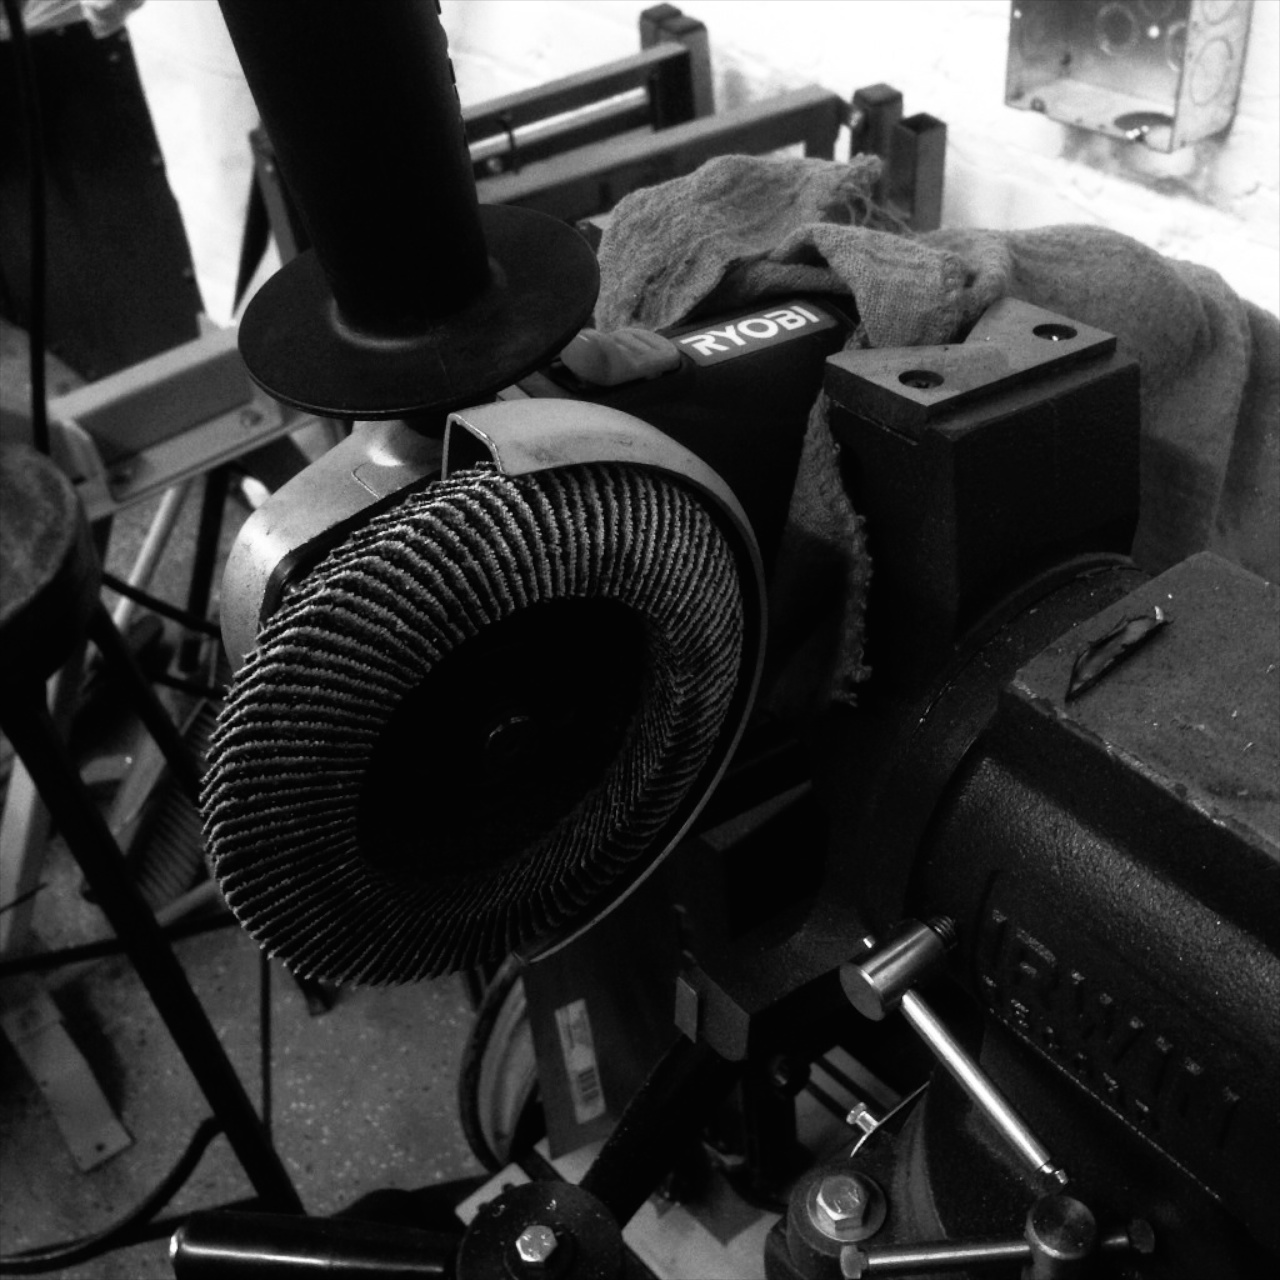
I flipped my bench vise over and used its pipe jaws. With a few rags as padding, I mounted my 4-1/2″ side grinder into my vice and installed a 40 grit flap wheel. With the the grinder in permanent “on” mode, I grabbed a pair of heavy duty leather gloves, some ear protection, and my full face shield. The flap wheel let me work the bracket against it with a high degree of control. It took the material down quickly, but still allowed me enough precision to work right up to my marks and make nice, straight edges. It also let me round off any sharp edges.
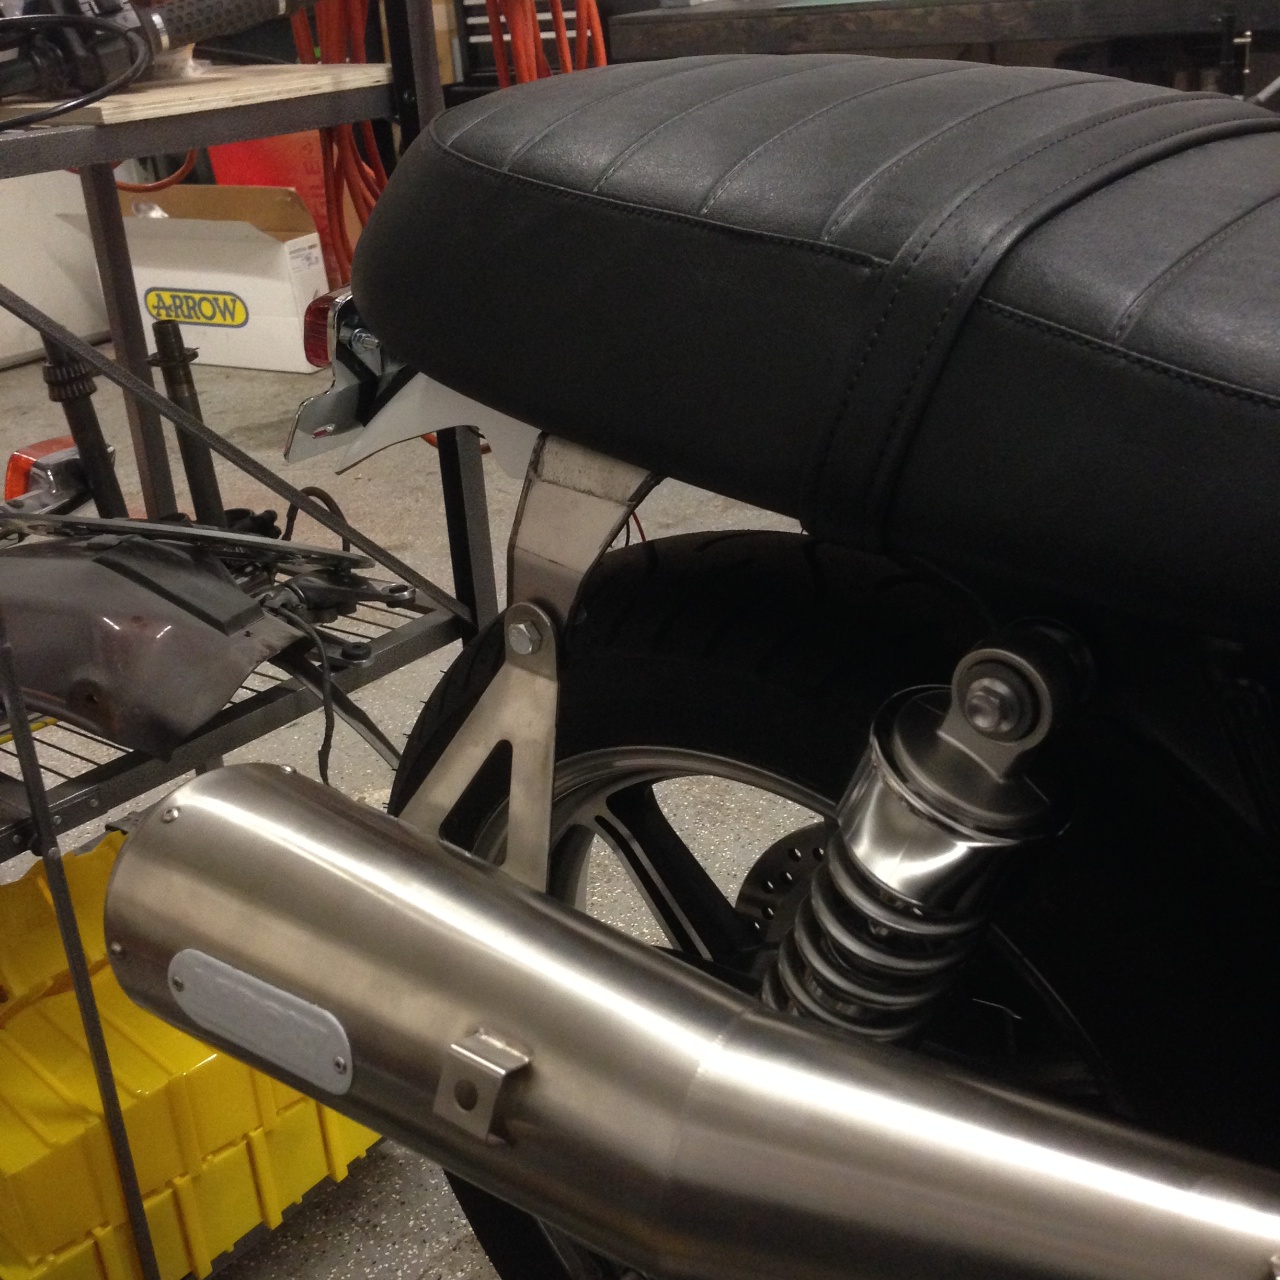
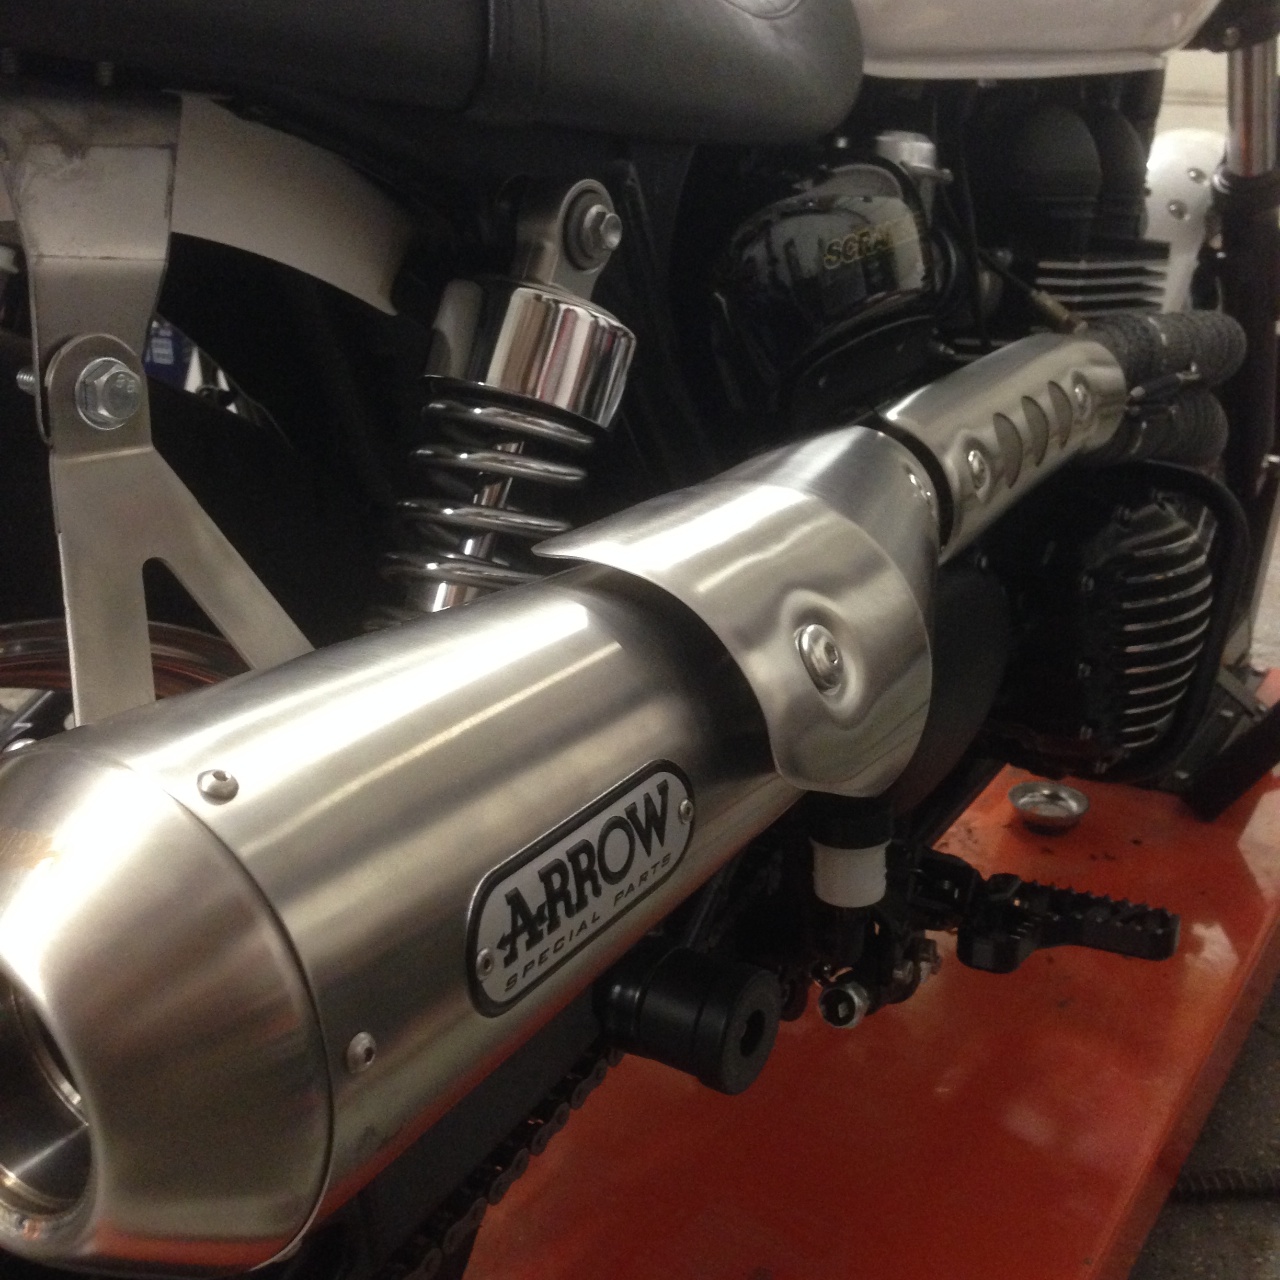
Even in just raw steel, my final hanger looked great. I used a spare side cover rubber grommet to rubber mount the bolt, and it was all done. Everything was solid and best of all, looked 100% intentional and clean.
With the exhaust now fully mocked up and verified, it was time to actually install it. This meant five key tasks:
- Disassemble the exhaust system and remove it from the bike
- Wrap the headers in black exhaust wrap
- Paint the heat shields, mounting ear, and hanger in high-temp black
- Extend the wiring for the brake light switch, as that would be relocated with the rear master cylinder
- Re-install the entire system for keeps
With only six nuts/bolts total, the exhaust system came off in no time. Nothing difficult remained at this point, just a bit of busy work. Yet these tasks were key to the final look of the project, so they were worth the extra effort.
From a high level design standpoint, part of my approach to this project has been in managing visual focus. What parts of the bike did I want to draw attention to, and which parts did I want to blend together? I’d created a visual belt-line for the bike, with mostly black details below the seat and tank, and brighter details above. Since the exhaust was below that belt line, I didn’t want a huge silver accent going down the entire side of the bike. Granted, the exhaust was the centerpiece of my design, but I still wanted it to be in harmony with the rest of the components around it. I did this in two ways.
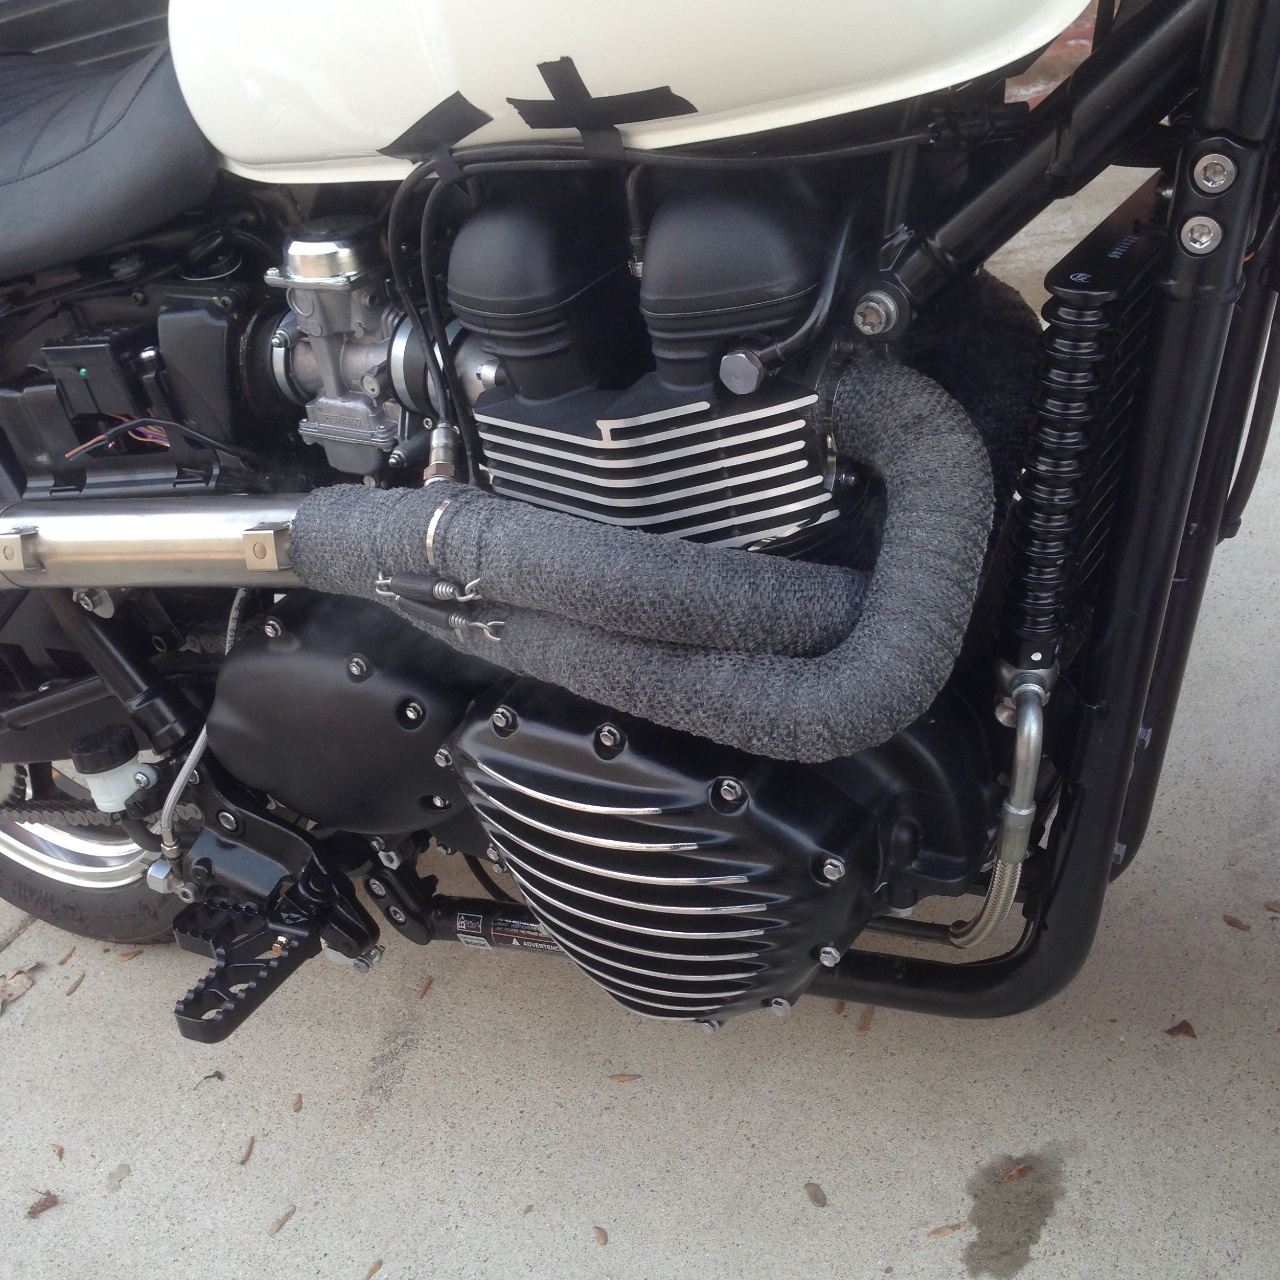
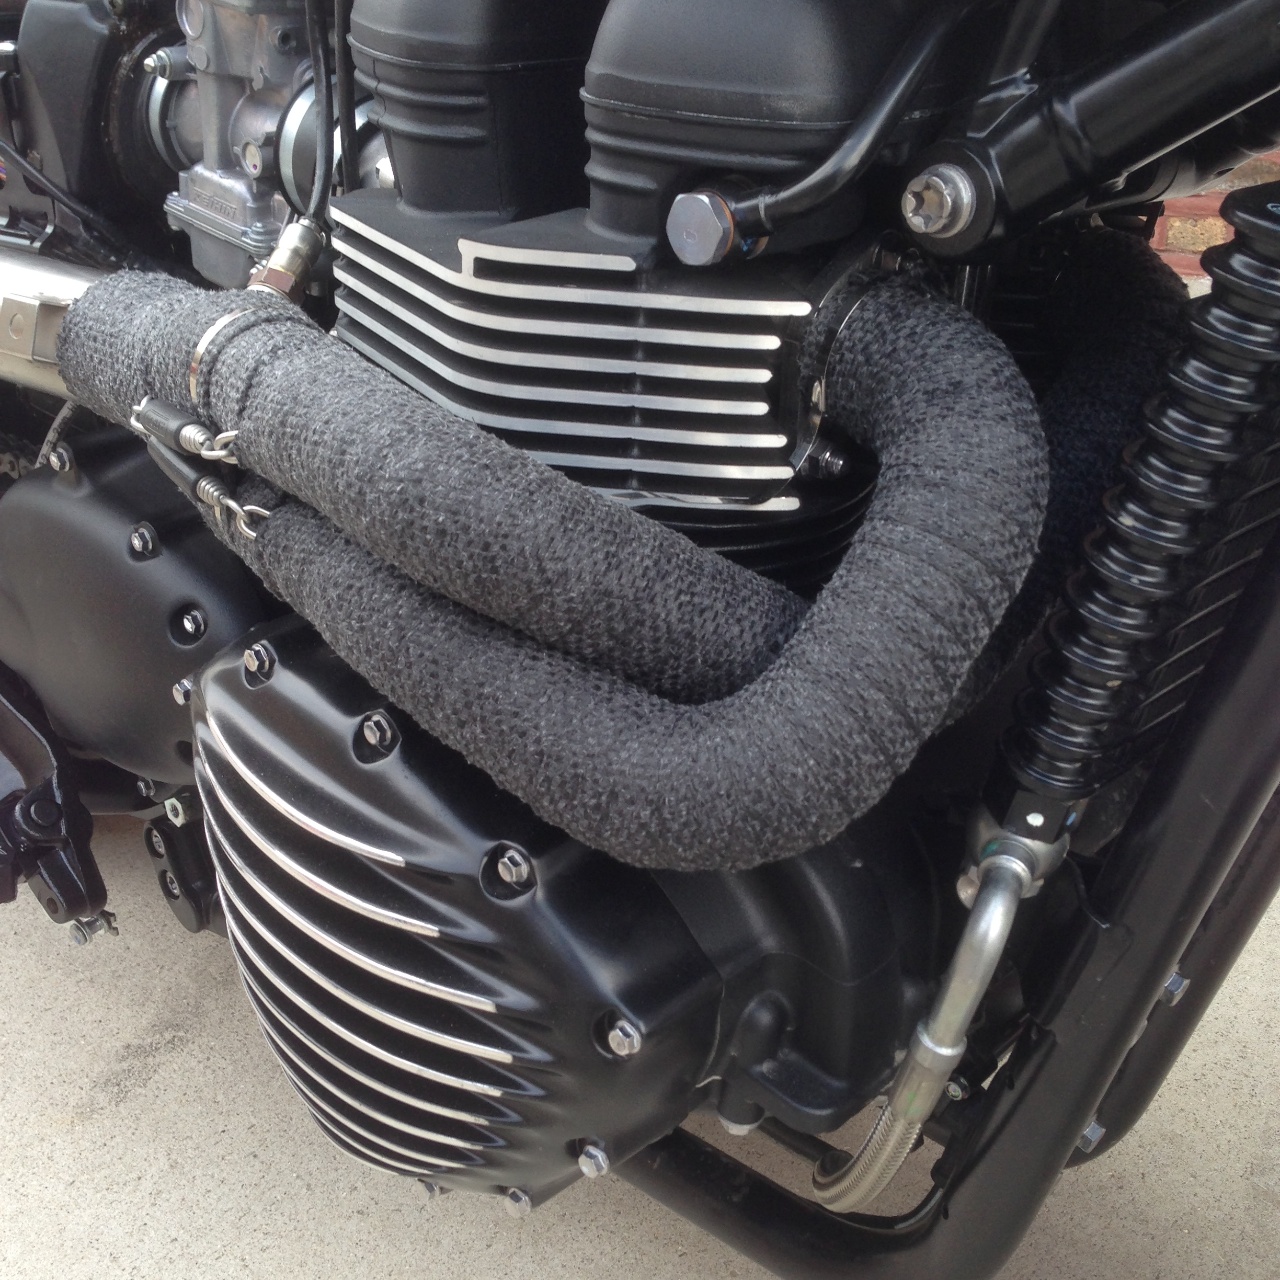
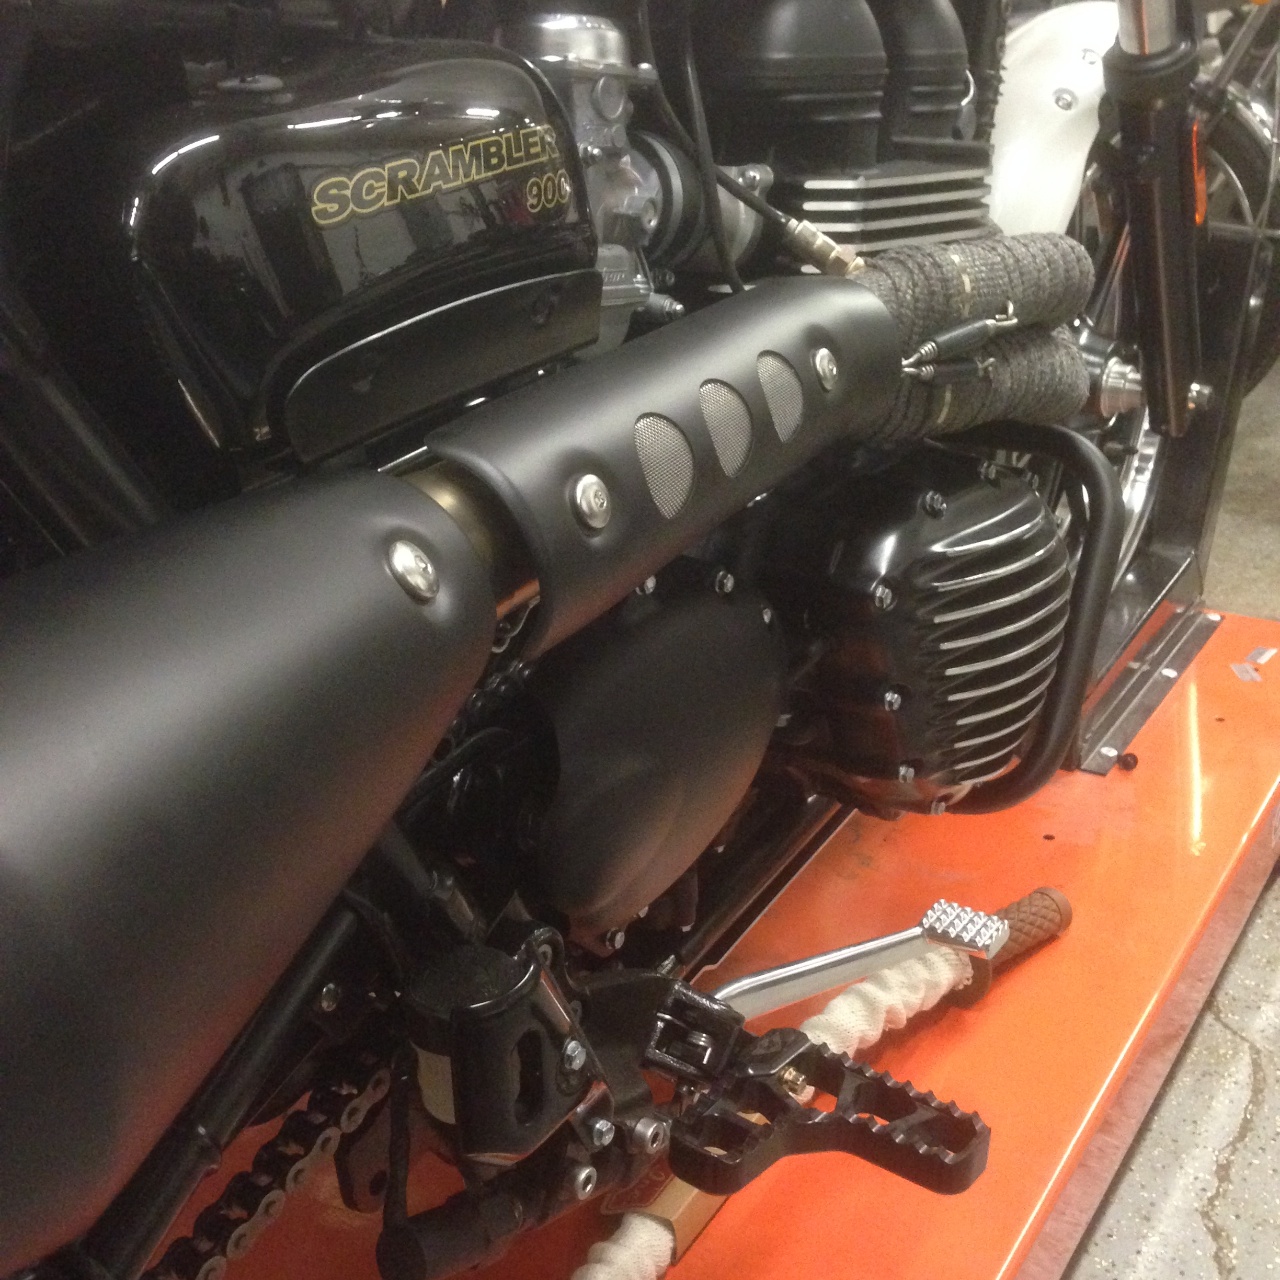
The first was to wrap the headers in black exhaust wrap, and the other was to black out the heat shields. I’d leave the rear two sections of the pipe in their raw stainless steel, but I’d go ahead and black out the mounting ear and my custom hanger so that they’d just blend in with the rest of the bottom half of the bike. No need to draw attention to those details.
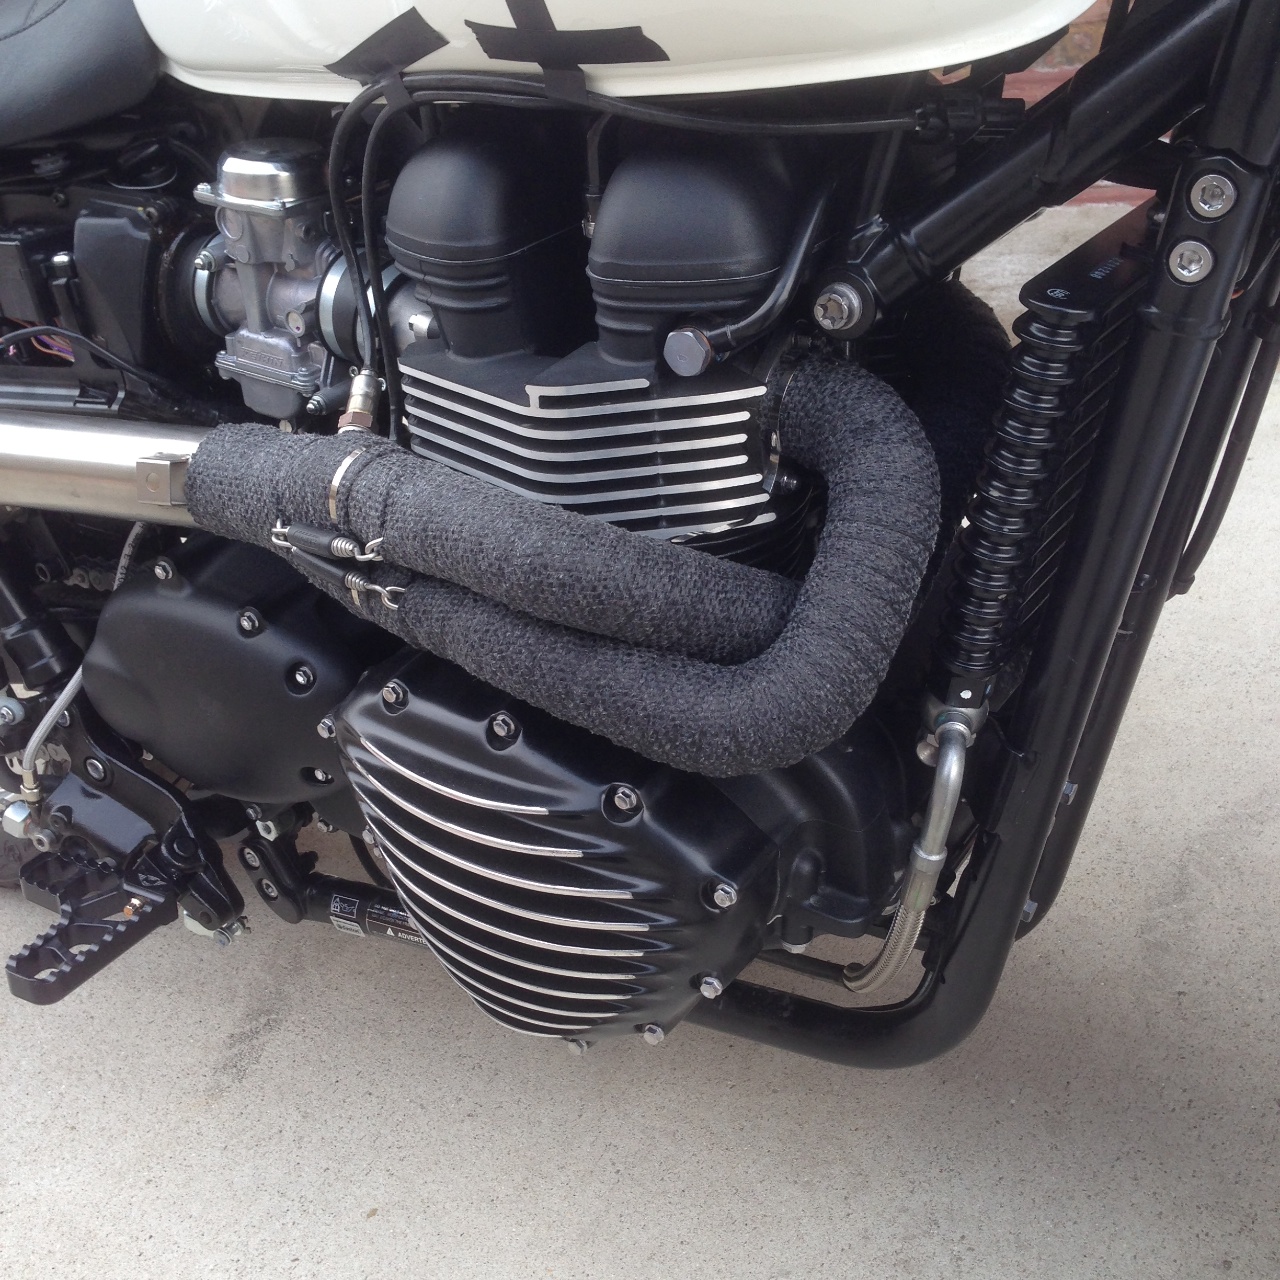
First, the wrap. Wrapping the headers would prove straightforward, but time-consuming. I’m not going to break down how to wrap pipes, since that information is readily available elsewhere, but I will include three key tips:
- Work with a partner. It’s much easier to wrap the pipes if one person can hold and rotate the pipe while the other keeps tension on the wrap and guides the overlap.
- Leave room for yourself up near the exhaust bolts. I had to procure a special 12mm wrench just to tighten up one nut in the end.
- Metal cable ties are great, but back them up with safety wire because they can fail and you do not want to have to try to re-wrap the pipes on-bike.
Since the wrap gets put on wet, there’s a heat-setting procedure you have to do once you’re done wrapping the pipes. This gets rid of trapped moisture and helps the wrap take its new shape and hold it. Bree “Wookie” Radloff had graciously helped me wrap the pipes, so we installed the exhaust with the rear section just dry fit and wheeled the Bonneville outside to run it for a while and heat set the wrap. The O2 sensor wires weren’t properly routed yet, so I had to just tape them to the tank temporarily to keep them off the hot parts of the engine and exhaust.
We fired up the bike to get started and I was immediately in love with the sound. It was like a slightly more sophisticated ’70s dirt bike exhaust note. Once again, the noise of the bike was making all the work and money completely worthwhile.
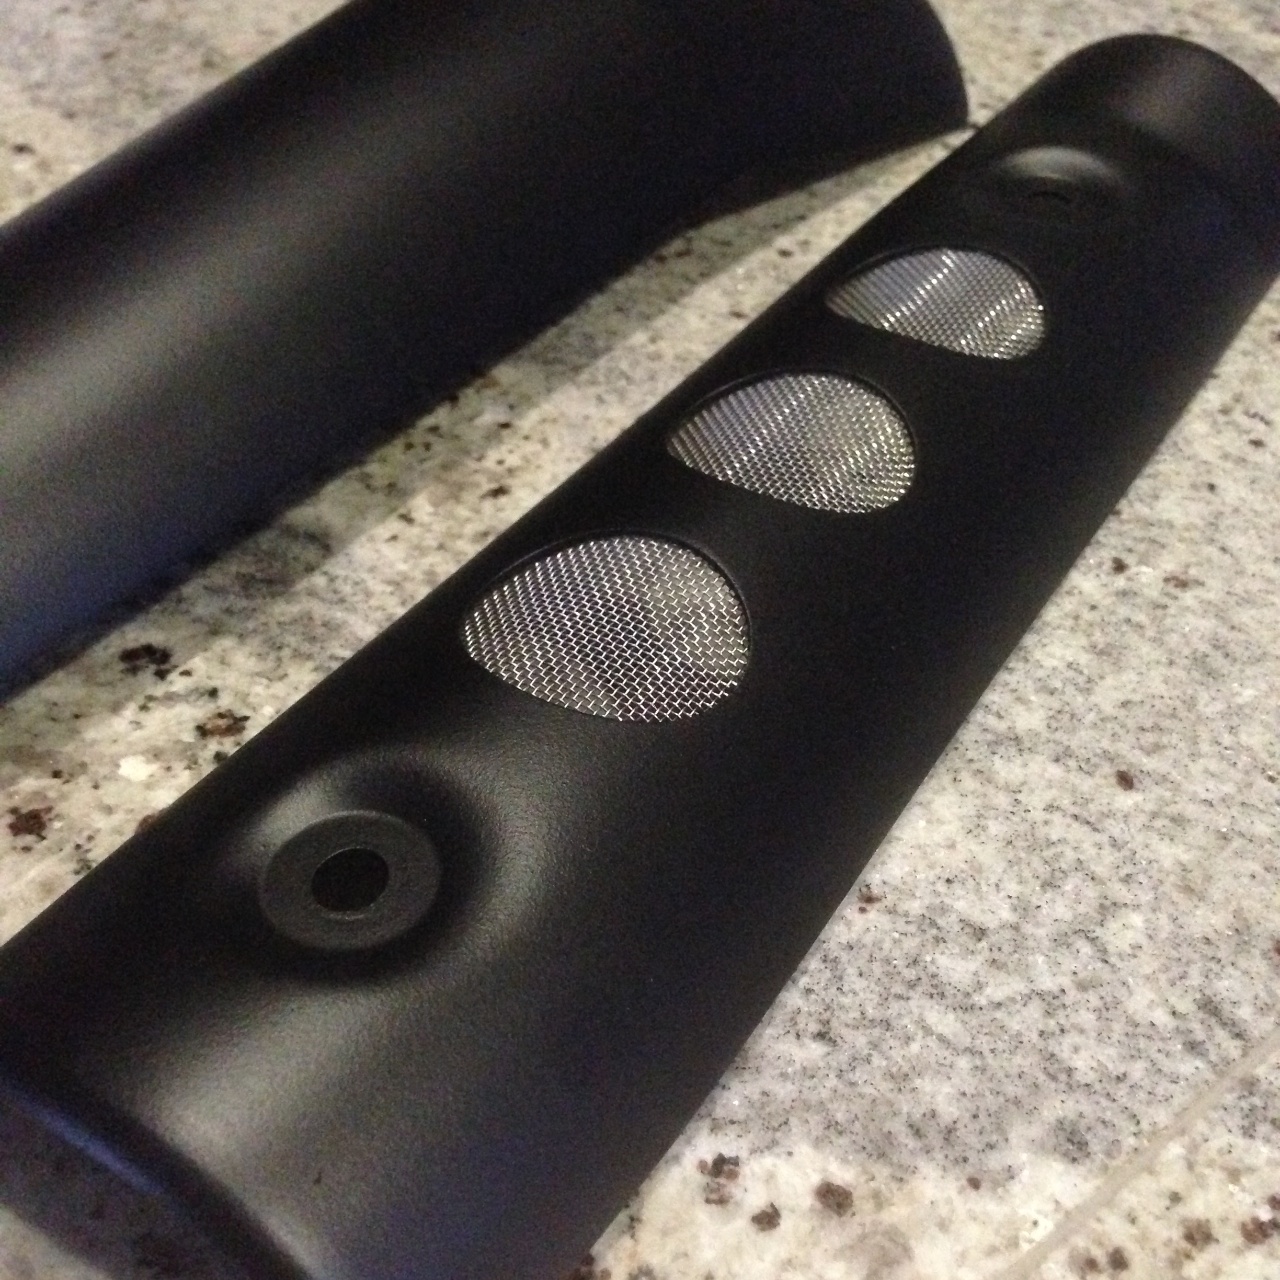
With the wrap done and the headers back on the bike, it was time to paint the exhaust pieces. Painting is something I often find intimidating. Yet with just a bit of YouTube research and some tips from professional friends, I realized that I could get great results right in the shop if I just did the work. To black out the heat shields and the hanging pieces, I first taped off the areas of the silencer I wasn’t going to paint. I also masked off the wire mesh details on the front heat shield. With just my paint surfaces showing, I was ready to prime. The surfaces already had a smooth, but porous surface thanks to the brushed finish, so I didn’t bother with the red Scotchbrite.
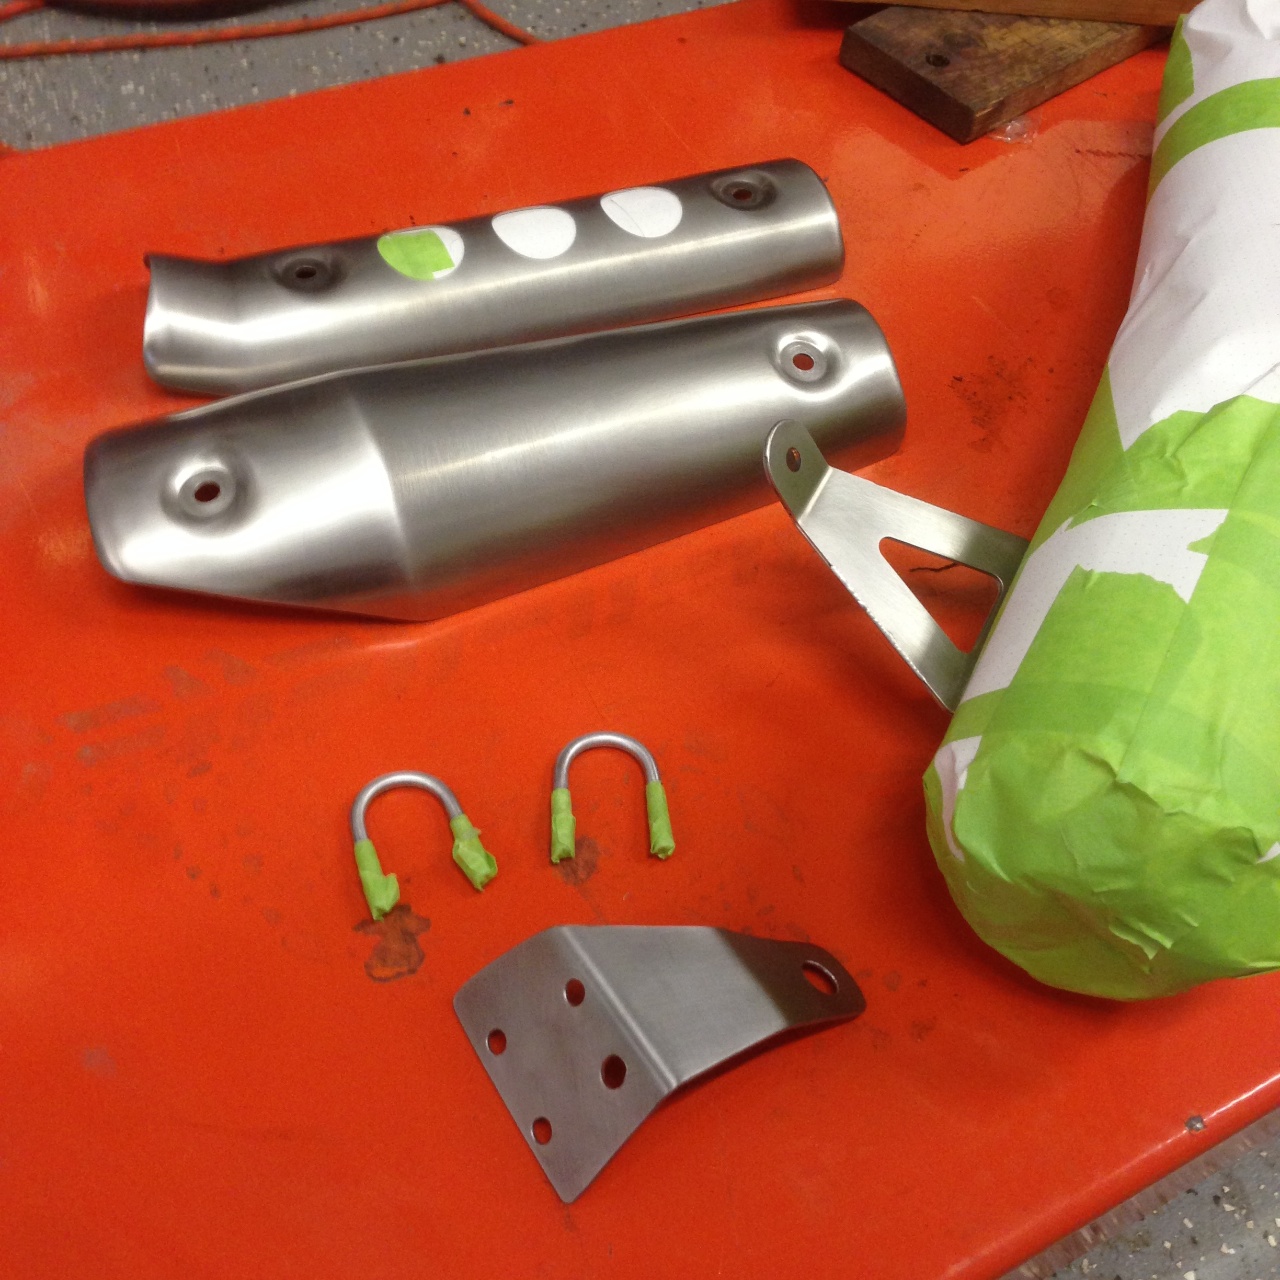

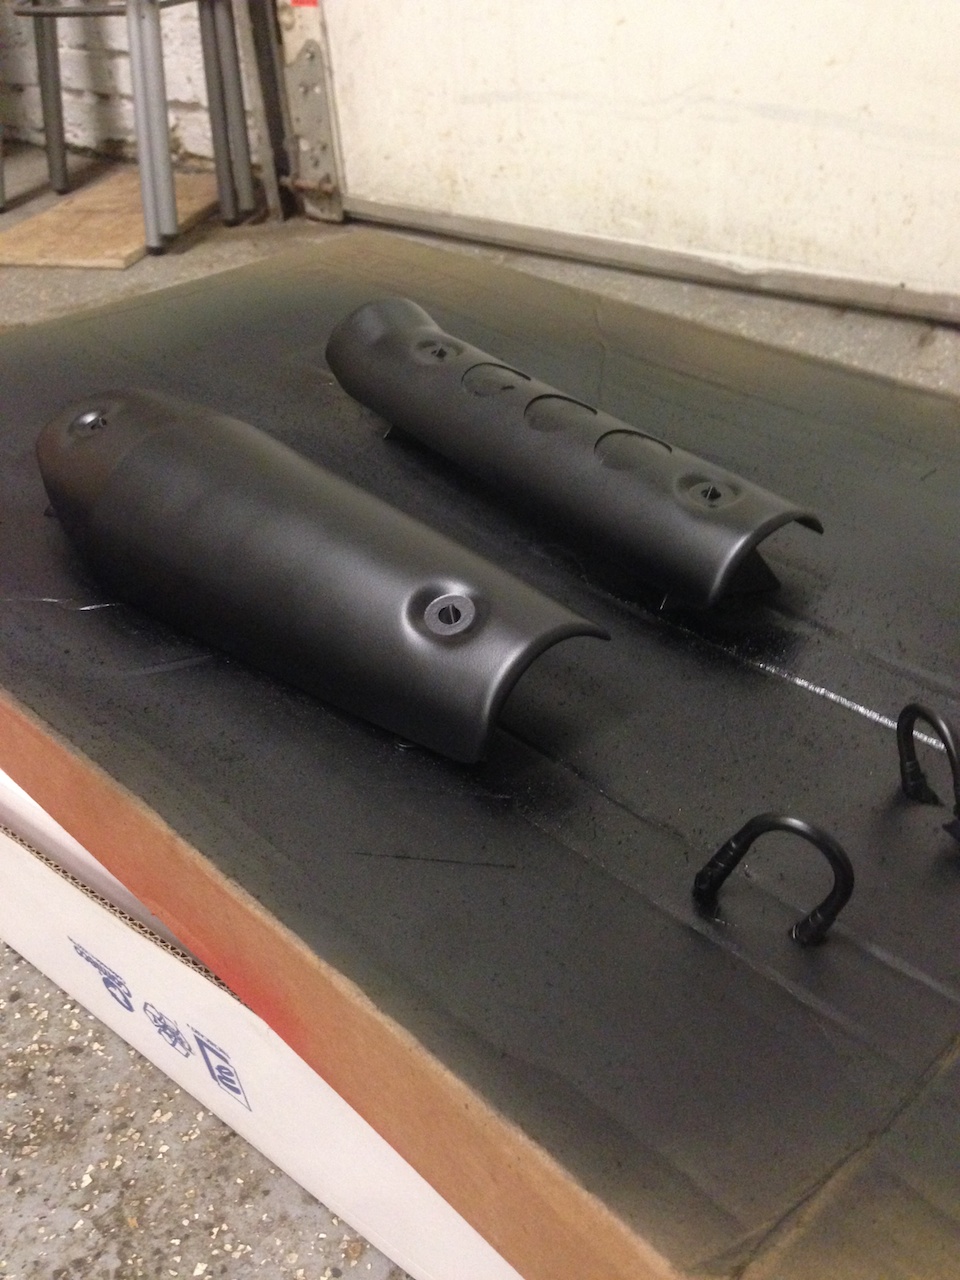
Following the instructions on the can, I applied three light coats of DupliColor self-etching primer. I love this stuff. It goes on very smooth and predictable, sticks like crazy, and the green color makes it easy to see where I have and haven’t got good coverage. I stayed within the DupliColor lineup for the black itself, selecting their semi-flat black high-temp engine enamel. Again, following the instructions on the can for time between coats, and following spraying techniques from YouTube, I was able to apply an even, thick finish to these exhaust parts. Once they fully cured, the slight texture and flat color of the engine enamel is a spot-on match for the factory black on the Triumph engine parts and frame. The entire process had taken about three hours with all the in-between time on the coats, but the result was worth it.

After the DupliColor-mandated five day waiting period (no I’m not kidding), it was finally time to fully install the exhaust. With the headers and mid section already on the bike, I fitted the hanger to the frame and pushed its rubber grommet into place. I slid the rear section into place and bolted it through. I unhooked the O2 sensors so as not to twist up their wiring and installed them as well. The hardest part was actually the retaining springs that go between the sections. It was tricky to pull hard against that sturdy little spring without actually pulling the bike along or loosing grip on it and shooting it across the room.
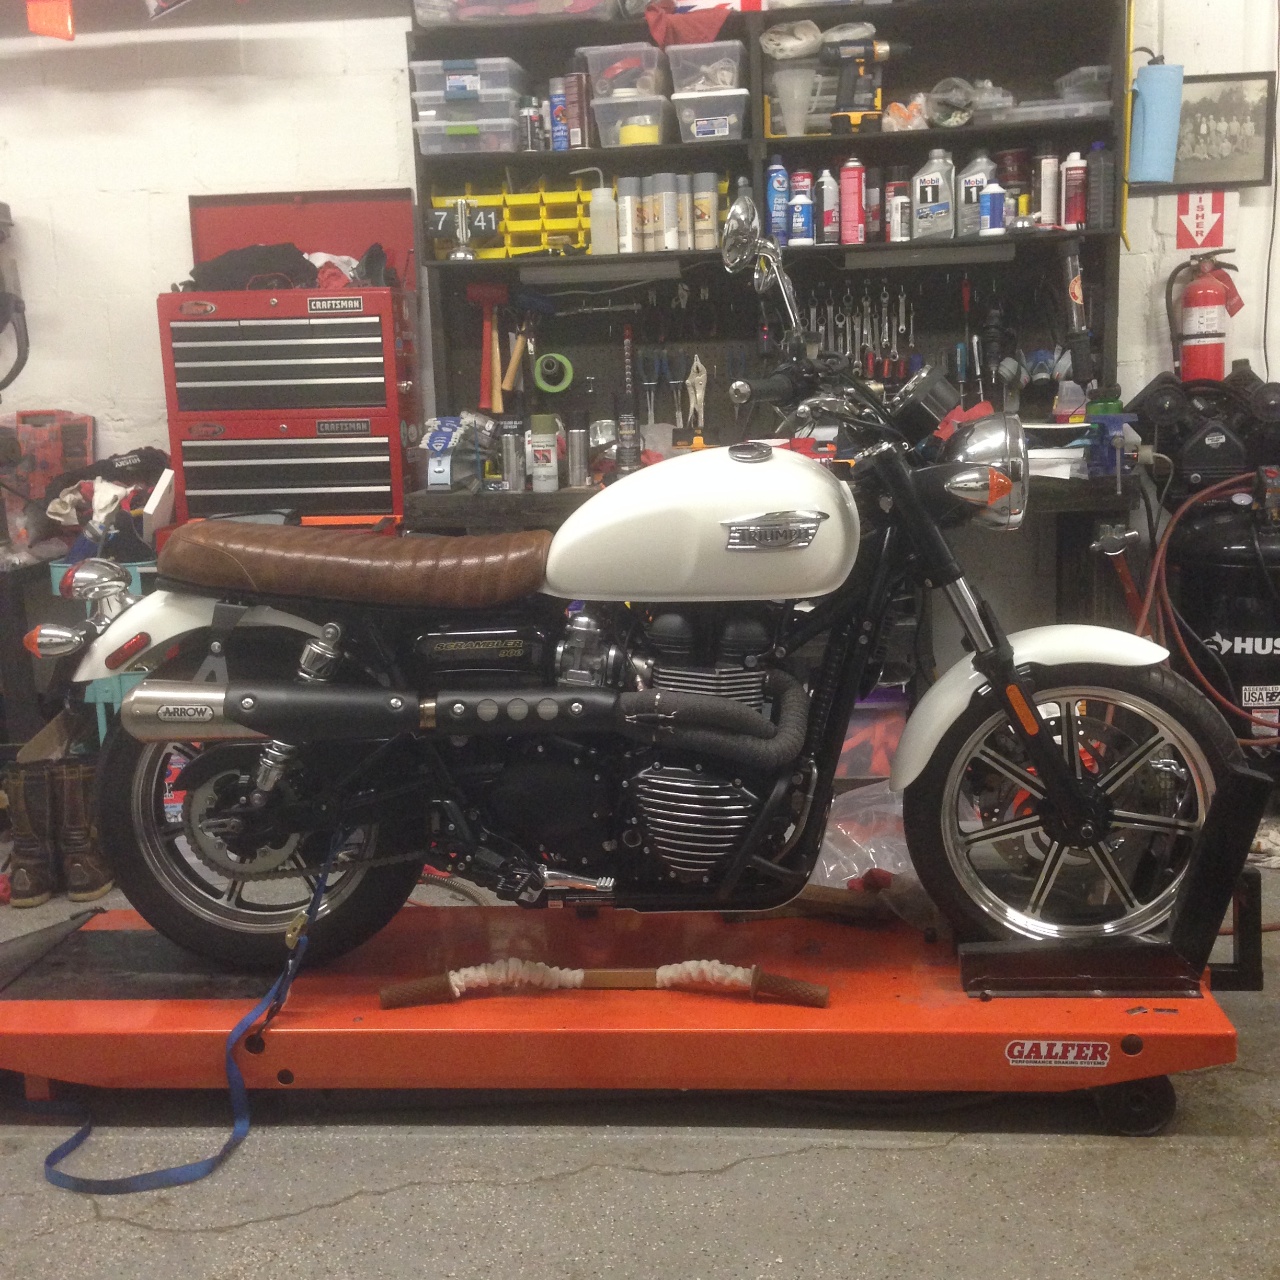
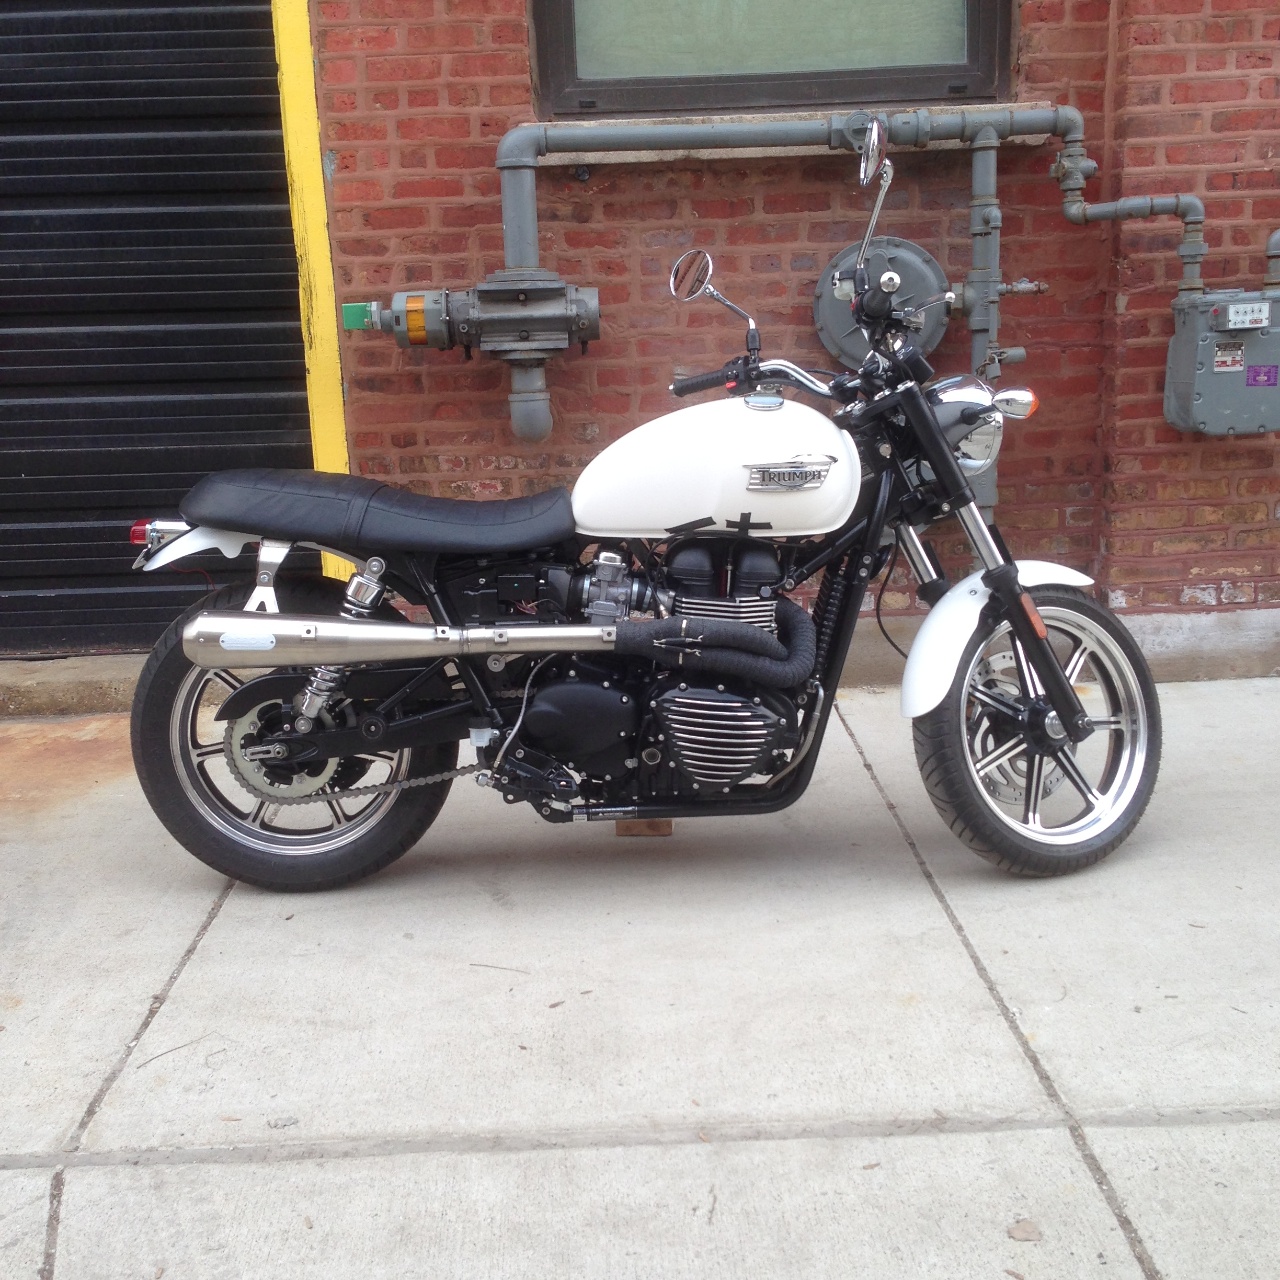
I saved the best for last, though. With four button-head bolts, the black heat shields went on for the first time. I pulled off the masking paper from over the mesh and that was that. The biggest part of this project was done. With the Scrambler side cover already in place, the right side of the bike had its new look, and it was a good look. I still didn’t have a rear brake, but that would come. The tedious part was over. Now all that stood between me and being rideable again were a dozen bolts and some brake fluid.

Meanwhile, in the midst of finishing up this part of the build, my brown leather British Customs Slammer seat arrived. Between the seat and the pipe, the measure of this transformation was pretty immense. Yet I was thrilled with how far the bike had come already. The big pieces were in place now.
The accomplishment was bittersweet. I could see what the bike was becoming, and it was pretty thrilling. The Arrow side pipe had absolutely transformed the stance, proportions and lines of the bike. Yet for all that change, I still had a long way to go. From here on out the changes would be more incremental, and there’d be a lot of them. Yet for now, I was immensely satisfied simply to have completed the biggest part of my vision for this bike. It’d been tedious, but it hadn’t been that difficult overall. There was nothing that stumped me or would have really held up any casual mechanic. That part of the project was intact as well. This was still a bike anybody could build.